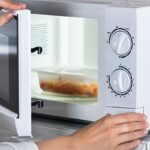
How To Remove An Over-the-range Microwave In A Safe Way?
You most likely selected an over-the-range microwave because of its modern, built-in appearance and functionality. More counter space in your kitchen and a cleaner, more personalized look are two benefits of moving the microwave off the counter. However, each of these advantages comes at the expense of adaptability. Building the microwave into the cabinets makes it more difficult to move or replace, but you shouldn’t let that stop you from switching to a new model when the time comes.
A replacement for an over-the-range microwave is actually simpler than you might think, and for the majority of people, it doesn’t even call for professional assistance. Use the detailed instructions below to safely remove an over-the-range microwave.
Table of Contents
How Can Over-the-range Microwaves Be Replaced?
Gather Tools
- Screwdriver
- Work Gloves
- Towel
- A Friend
- A Step-Ladder
Obtain the necessary tools and then begin your process. Prepare them ahead of time so you won’t have to look for them and can use them when needed. A screwdriver with a Phillips (cross) head and an average size is required for this process. Having the microwave and other parts safely set down when the appliance is brought down requires a towel as well.
Wearing work gloves that will shield your hands from edges and improve your grip can be beneficial. Additionally, you might want a friend to assist you in safely supporting and lowering the microwave when the time comes. Take a step ladder into consideration as well because some of these brackets are up high.
Measure Current Microwave
To determine which size to purchase, measure your current setup as the first step in the replacement process. Over-the-range microwaves typically have dimensions of 29 to 30 inches in width and 15 to 16 inches in depth, but height can vary, so be sure to get an exact measurement before purchasing a new built-in microwave.
Choose Your New Unit
Utilize the measurements of your current configuration to choose a new microwave now that you have them. You ought to purchase an over-the-range microwave with a trim kit for the simplest installation possible. Keep in mind that standard models are not intended to be mounted. Choose a microwave that has some of the more popular contemporary features, such as convection modes and quick cooking times. The best microwave brands to look for are Whirlpool, GE, Frigidaire, and KitchenAid.
Take Out The Microwave Oven
The mounting bracket should be tilted forward. The wall-mounting bracket secures the microwave oven’s back to the surface. Hold the microwave’s front firmly in place with both hands to prevent it from falling forward. To make the label on the bracket looser, start tilting the microwave. Up until a 30 degree tilt, keep tilting your microwave.
The mounting bracket on the wall will be damaged if you take the microwave oven out of its tight fitting.
If you need help holding the microwave because it is too heavy, ask a friend to help.
The microwave can be removed from the wall by gently lifting it. To remove the label from the mounting bracket on the microwave oven’s bottom, support it from below and lift it just a little. When you pick up the microwave, slowly move away until it disappears through the opening. So that you won’t have to stoop, place the microwave on the counter.
The wall-mounting bracket must be unscrewed. With three or four screws, the mounting bracket will be secured to the wall. To take the screws out and take the bracket off the wall, use an electric screwdriver.
Try not to use the old mounting bracket to hang the new microwave oven.
Start To Install The Mounting Plate
The microwave oven needs to be mounted on two wall studs, but one will do. The mounting bracket should be fastened to the stud with lag screws. The wall stud or studs can be found using a stud finder; once they have been located, they can be marked.
To assist with properly positioning the new microwave, use a measuring tape to locate the opening’s center and mark the centerline on the wall.
A template for positioning the mounting screws ought to have been included with your microwave. Align the template on the back wall with the centerline you previously marked. Use tape to attach the template to the back wall after making sure it is level. If there isn’t a template, place the mounting holes as directed by the manufacturer.
Remove the template after marking the two mounting holes in the lower corners.
Mark the hole or holes that align with the wall stud or studs, and then use the markings to align the mounting plate.
Drill where the holes are marked using the proper drill bit. Make sure to use lag screws and at least one screw that will be secured to a stud.
Where there isn’t a wall stud, toggle nuts are used to help secure the mounting bracket by gripping the drywall. Start threading on the toggle nuts after inserting the round-head bolts through the mounting plate’s end holes.
Use the toggle nuts, round-head bolts, and lag screws to realign the mounting plate and secure it to the wall.
To tighten the screws and bolts, first, make sure the mounting plate is level.
Read about: Can You Microwave Mason Jars? Is It Safe? – Most Nutritious Foods
Make A Preparation To The Upper Cabinet
To accommodate the power cord and mounting screws, the upper cabinet needs holes. To fit the power cord through, in particular, you might be able to use the upper cabinet’s existing holes. To determine where the holes must be, use the upper cabinet template.
The upper cabinet template should be fastened to the cabinet’s base with tape or thumbtacks. Verify that the cabinet’s centerline and the wall’s centerline are in line with each other.
Drill through the bottom of the cabinet, as shown on the template, the power cord access hole if necessary.
Then, if necessary, drill the holes for the cabinet mounting bolts according to the template’s instructions using the appropriate drill bit. Remove the template once it is finished.
Place the mounting bolts and washers in the cabinet close to the holes, with a washer sliding over each flathead bolt.
Install The Microwave
You should get assistance with this procedure from someone. To prevent it from opening while the microwave is being installed, you might also want to tape the door shut.
- Lock the microwave’s back onto the mounting plate’s support tabs while having a helping hand to lift the appliance. Next, feed the power cord through the cabinet’s hole.
- Thread the mounting bolts into the microwave’s top while someone is holding it in place. They should go through the upper cabinet.
- After ensuring the microwave is securely fastened, tighten the mounting bolts.
- Attach any necessary filters underneath the microwave.
- Turn the power back on by inserting the power cord into the outlet.
- Place the turntable and support for the turntable inside the microwave.
- Make sure the microwave is operating properly by testing it.
What Equipment Do I Need To Install A Microhood?
A standard drill, a tape measure, a screwdriver, and an extra pair of hands are probably necessary for installation. However, make sure to always read the manual. An eye shield like goggles and a level may be required for more demanding jobs.
A Guide To Vent An Over-the-range Microwave
You’ll need to put in a little extra work to make sure your venting or filters are installed correctly if your microwave also serves as smoke and grease extractor while you cook on the range below. The filters can be put in place without much difficulty. Always make sure to follow the instructions in your owner’s manual when it comes to ducting, but in general, you’ll need to connect the duct before and as you install if your microwave doubles as a range hood. Additionally, be sure your damper is connected properly.
Conclusion
So, how to remove an over-the-range microwave in a safe way?
A lot of counter space is freed up by an over-the-range microwave, which hangs above your stove. You can easily remove your microwave by undoing a few screws if it is broken or needs to be replaced. All you have to do is lift the microwave out and away from the wall once it is unlocked. You’ll have enough room in a matter of minutes to set up a new microwave!